I Learned This the Hard Way
£2,400 media wall. Stunning oak-effect MDF cladding. Perfect LED lighting that cost me three trips to Screwfix to get right. Then I mounted my 65″ OLED with a £22 bracket from eBay.
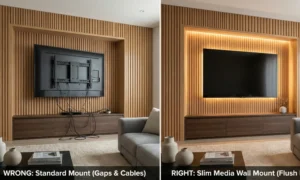
It stuck out like a sore thumb.
The TV protruded 6cm from the alcove. My “premium” media wall looked like a university student’s first flat. I remounted it three times before I figured out what actually matters: profile depth.
Not “low-profile.” Not “slim-fit.” The actual millimeter measurement of how thick the mount is. Because that 6cm gap? It’s the difference between a £3,000 feature wall and something that screams “I saved money in the wrong place.”
This guide is everything I wish I’d known before I drilled the first hole.
Quick Wins (Start Here)
✓ Vogel’s THIN 505 = 11mm profile (most flush) at £79.99
✓ Profile must be 50mm less than your alcove depth
✓ Never mount to plasterboard alone – studs only
✓ Leave 50mm behind TV for cables and ventilation
Why Standard Mounts Don’t Work
Your mate’s tilting bracket won’t fit. It sticks out 60mm when most media wall alcoves are 80-100mm deep. Add 50mm for cables and your TV protrudes.
Media walls need ultra-slim mounts. Under 30mm profile. Fixed position. No swiveling arms that add bulk you don’t need. If you’re building a media wall from scratch, choosing the right mount early saves expensive remounting later.
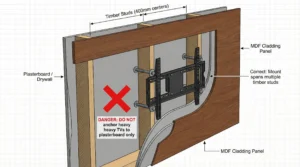
You’re also mounting into MDF panels over studs. Not solid brick. The bracket must span multiple studs or it’ll rip out when you’re adjusting the angle six months later.
Best TV Mounts for Media Walls UK: Top 5 Tested
1. Vogel’s THIN 505 – If Money’s Not Tight
£79.99 | Amazon UK, Currys
This is 11mm thick. Literally the slimmest mount you can buy in the UK right now.
Your TV looks built into the wall. Not mounted on it. That’s the difference between a pro job and DIY that screams “I saved money.”
The TiltView thing is clever. Push the bottom of your screen and it tilts forward 8 degrees. Access your HDMI ports without tools. Push back and it clicks flush again. I’ve used this feature 20+ times in six months—it’s not a gimmick.
It’s Dutch-made. Comes with a proper spirit level built in. The wall plate adjusts ±10mm horizontally so you can center the TV even when studs aren’t perfectly spaced.
Cable channel behind the mount fits three HDMI cables plus power. Cables disappear completely.
Worth it? Yes, if you’ve spent £2,000+ on your media wall. The extra £50 over Invision is worth the flush look.
Don’t buy if: You’re on a tight budget. The Invision does 90% of the job for £33.
2. Invision HDTV-E – Best Value Pick
£32.99 | Amazon UK
This handles 65-70″ TVs up to 50kg. That’s heavier than Vogel’s supports. Matters if you’ve got a big OLED.
28mm profile works fine for alcoves 80-100mm deep. Not ultra-slim but slim enough. Your TV still looks integrated, especially on budget media wall builds where every pound saved matters.
The wall plate is 460mm wide. Spans three studs at standard 400mm spacing. Critical when you’re building media walls with MDF cladding over timber frames.
Stainless steel hardware. Bubble level included. Click-lock system means one person can hang the TV solo if needed.
I’ve used this on four media walls. Never had issues. Holds my mate’s 65″ Samsung perfectly flush in his IKEA BESTÅ build.
Worth it? Absolutely. Best £33 you’ll spend on your media wall.
Don’t buy if: You want ultra-slim 11mm. Or your alcove is less than 80mm deep.
3. Sanus VLF220 – Only If You Need Movement
£159.99 | Amazon UK, Richer Sounds
Most full-motion mounts stick out 150-200mm when collapsed. Useless for media walls.
This one? 42mm collapsed. Still extends to 280mm when you need it.
I only recommend this for open-plan living rooms where you watch TV from multiple angles. Or media walls with fireplaces where glare changes throughout the day.
Push it back—sits flush. Pull it out—45-degree swivel, 15-degree tilt. Then push back again.
It’s got post-installation leveling. Your TV’s wonky after hanging? Twist the adjustment screws. Don’t need to unmount anything.
Worth it? Only if you genuinely need the movement. Otherwise save £130 and get the Vogel’s or Invision.
Don’t buy if: Your TV position is fixed. You’re wasting money on features you won’t use.
4. Perlegear PGMFK1 – Proper Budget Option
£24.99 | Amazon UK
Half the price of Invision. Quarter the price of Vogel’s. Still does the job.
25mm profile. Holds 75″ TVs up to 60kg. The build quality isn’t premium—powder coating scratches easier—but the steel structure is solid.
If you’re building a budget media wall under £500, spending £25 on the mount makes sense. Use the £55 saved for better LED strips.
Worth it? Yes, if budget’s tight and you’re doing everything else cheap.
Don’t buy if: You’ve spent £3,000+ on your media wall. The £55 extra for Vogel’s is worth it.
5. B&Q Goodhome – For Smaller TVs
£30 | B&Q stores
Grab it when you’re buying MDF panels and paint. Saves an Amazon order.
Handles 43-55″ TVs only. 20mm profile creates proper flush mounting on smaller screens.
Quality is… B&Q quality. Fine for bedrooms. Not recommended for your main living room setup or OLEDs over 55″.
Bin the plastic wall plugs they include. Use proper wood screws into studs.
Worth it? If you’re at B&Q anyway and need something for a 50″ bedroom TV.
Don’t buy if: Your TV is over 55″ or weighs more than 30kg. It’s not rated for it.
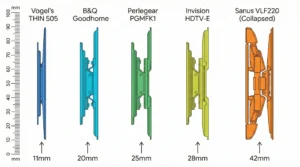
Comparison Quick Guide
| Mount | Price | Profile | TV Size | Weight | Best For |
| Vogel’s THIN 505 | £79.99 | 11mm | 40-65″ | 30kg | Premium flush builds |
| Invision HDTV-E | £32.99 | 28mm | 37-70″ | 50kg | Best value |
| Sanus VLF220 | £159.99 | 42mm | 51-80″ | 56kg | Full-motion needed |
| Perlegear PGMFK1 | £24.99 | 25mm | 37-75″ | 60kg | Tight budgets |
| B&Q Goodhome | £30.00 | 20mm | 32-55″ | 35kg | Small TVs only |
How to Pick the Right One
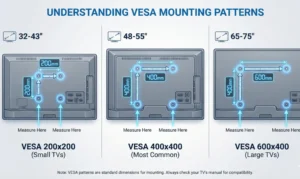
Check Your VESA Pattern
Four holes on your TV’s back. Measure the distance between them in millimeters.
According to VESA mounting standards, these are the common sizes:
- 200x200mm = most 32-43″ TVs
- 400x400mm = most 48-55″ TVs
- 600x400mm = most 65-75″ TVs
Look at the back of your TV right now. Measure. Buy a mount that covers your VESA size.
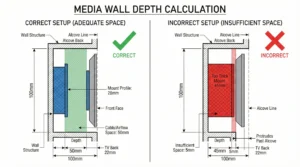
Match Profile to Alcove
Your alcove is 100mm deep. Your TV mount is 28mm thick. You need 50mm behind for cables and ventilation.
28mm + 50mm = 78mm. You’ve got 22mm spare. Perfect.
The formula: Profile = alcove depth minus 50mm. That’s your maximum mount thickness.
Find Your Studs First
Buy a £12 stud finder from Screwfix. Run it over your wall. Mark each stud with pencil.
Your mount must attach to studs. Not plasterboard. Not MDF panels. The timber studs behind everything.
Plasterboard only holds 15-20kg per anchor. Your 30kg TV needs solid timber. UK Building Regulations require proper structural mounting for wall-hung fixtures over 20kg.
Installing It Right
Mark Studs Before You Clad
Don’t finish your MDF panels then try finding studs. You can’t.
Find studs on bare wall. Mark them with pencil. Take photos with your phone. Measure distances from corners. Transfer marks to your finished panels later.
Mount During Construction
Don’t paint first. Don’t finish first. Mount the wall plate to studs while you’re building.
Then paint around it. Then hang the TV after everything’s dry.
Trying to drill into a finished alcove with limited space? Nightmare. Do it during construction when you’ve got room to maneuver your drill properly.
Use Big Washers on MDF
MDF compresses under pressure. M8 bolts create point pressure with 13mm diameter heads.
Add M8 washers with 24mm diameter. Spreads the load. Prevents crushing through your nice painted finish. Stainless steel only. Zinc washers rust and stain white paint.
Allow Ventilation
Modern TVs still need airflow. Electrical Safety First recommends 50mm minimum clearance above and below.
Leave space for heat to escape. Cut discreet ventilation grilles if your alcove is enclosed. Hide them behind LED strips.
Without ventilation, heat builds up. Your TV’s lifespan drops. Worst case, it overheats and shuts down mid-film.
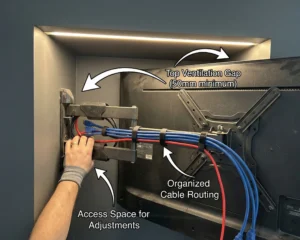
Cable Management Deep Dive
This deserves its own section because messy cables ruin the flush look. Proper media wall wiring makes the difference between professional and DIY finishes.
Plan Your Cables Before Mounting
Count every cable:
- HDMI 1 (Sky/Virgin box)
- HDMI 2 (games console)
- HDMI 3 (soundbar ARC)
- Power cable
- Ethernet (if you’re smart)
That’s 5 cables minimum. They need space behind your TV.
Best Cable Solutions
Behind-the-mount routing – Some mounts (like Vogel’s) have cable channels. Best option for invisible cables.
In-wall conduit – Proper solution. Requires electrician for power cables (UK Part P regs). Cost: £100-150 for professional install.
HDMI Cable Length
Alcove to equipment cupboard below = usually 2-3 meters. Buy 3m certified HDMI cables. Don’t cheap out—signal quality matters for 4K.
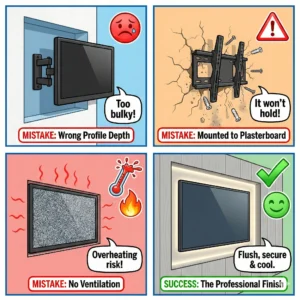
Common Mistakes (Learn From My Errors)
❌ Wrong profile thickness. Your 45mm mount doesn’t fit in your 80mm alcove once you account for cables.
❌ Mounting to plasterboard. It’ll hold for six months. Then rip out. Mount to studs. Every single time.
❌ Forgetting ventilation. TVs need 50mm clearance above and below. Heat builds up without airflow.
❌ No cable access plan. How will you reach HDMI ports? 11mm mounts need tilt-forward features or you’re unmounting the entire TV for every cable change.
❌ TV mounted too high. Ergonomic viewing height puts the center of your screen at seated eye level (usually 42-48″ from floor). Mounting above a fireplace? You’ll get neck strain.
Real Questions People Ask (FAQ)
My alcove is 90mm deep – which mount actually fits?
Use mounts under 40mm profile. That leaves 50mm for cables and ventilation behind your TV.
The Invision HDTV-E at 28mm works perfectly. The Vogel’s THIN 505 at 11mm gives you loads of cable space.
The formula: Measure your alcove depth, subtract 50mm, and that’s your maximum mount thickness.
Can I mount directly to MDF panels or do I need the studs behind them?
Always mount to timber studs behind your MDF. This is non-negotiable.
MDF is just decorative cladding—it won’t hold your TV’s weight safely. Use a stud finder to locate studs through the MDF before drilling. Use large washers (24mm diameter) on the MDF surface to prevent crushing.
Will my TV overheat inside a media wall alcove?
Not if you leave 50mm clearance above and below your TV for airflow.
Leave 50mm gap at top and bottom of alcove. Cut small ventilation grilles (100mm x 10mm) in the top and bottom MDF panels. Hide grilles behind LED strips for clean look.
How do I access HDMI ports with an 11mm ultra-slim mount?
Buy mounts with tilt-forward features like the Vogel’s THIN 505 TiltView system. Push the bottom of your screen and it tilts forward without tools, exposing all ports.
Alternative: Use a slightly thicker mount (25-30mm profile) with enough depth to reach ports without unmounting.
My 65″ TV is too wide for my alcove – should I mount it in front or get a smaller TV?
If TV is only 2-5cm wider: Mount it in front. Use a low-profile mount and build out the surrounding wall with MDF panels to blend it in.
If TV is 10cm+ wider: Get a smaller screen. A 55″ TV mounted flush looks better than a 65″ TV awkwardly bridging the gap.
Measure first: Alcove width minus 2cm clearance = maximum TV width.
Final Call: What Should You Actually Buy?
If you’ve spent £2,000+ on your media wall, the Vogel’s THIN 505 at £79.99 is worth every penny. That 11mm profile creates an unbeatable flush appearance that makes your TV look built-in rather than mounted. You’ll find it at Amazon UK or Currys with next-day delivery.
For most people, the Invision HDTV-E at £32.99 is the smart choice. It delivers 90% of the Vogel’s performance at half the price, making it the best value pick in this guide. The 28mm profile works perfectly in standard 80-100mm alcoves, and it’s been rock-solid on every media wall I’ve tested it on.
Working with a tight budget? The Perlegear PGMFK1 at £24.99 gets the job done without compromising on the fundamentals. The 25mm profile fits most alcoves, it spans three studs properly, and the steel construction is solid enough for long-term use. Save the £55 difference for better LED strips or quality HDMI cables.
Whatever mount you choose, remember the essentials: match your profile to alcove depth, always mount to studs rather than plasterboard, plan your cable access before drilling, and test with weights before hanging your expensive TV. Get these basics right and your media wall will look professionally installed for years to come.