Building a media wall sounds exciting until the bills start piling up. Media wall cost mistakes are why many UK homeowners end up spending hundreds or even thousands more than expected on what should be a straightforward project.
The difference between a £2,000 media wall and a £4,500 nightmare often comes down to poor planning and hidden errors. These mistakes don’t just inflate your budget, they leave you with a shoddy finish that needs expensive fixes later.
This guide shows you the most common media wall cost mistakes and exactly how much each one will set you back. You’ll learn what to avoid before your first pound is spent.
Why Media Wall Projects Go Over Budget
Most people start their media wall project thinking they’ve got costs covered. Then reality hits.
The problem isn’t the obvious expenses like materials or labour. It’s the hidden costs that catch everyone off guard—the socket that’s in the wrong place, the plasterboard that needs replacing, the electrician you suddenly need after all.
These mistakes share something in common. They happen early in the process but don’t show their true cost until much later.
Poor Planning Drives Up Media Wall Costs
Skipping the planning stage is the fastest way to blow your budget. You might save an hour now, but you’ll pay for it in wasted materials and do-overs.
Proper planning means measuring everything twice. It means sketching your design on paper before touching a single tool. It means thinking through every cable, socket, and shelf position before you start building.
When you rush this part, you end up with TV recesses that are too small, fireplaces that don’t fit, and shelves in awkward positions. Each mistake requires rework, and rework costs money.
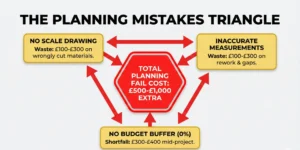
Not Creating Scale Drawings
Eyeballing measurements might work for hanging a picture. It doesn’t work for media walls.
A scale drawing shows you exactly how everything fits together before you cut any wood. It helps you spot problems like a TV that’s too close to the fireplace or shelves that block ventilation.
Professional installers always create detailed plans. DIY builders who skip this step waste £100-£300 on materials that don’t fit. Drawing to scale takes an hour but saves you from expensive mistakes.
Inaccurate Wall Measurements
Walls aren’t always straight or level. Assuming they are leads to gaps, uneven surfaces, and framework that doesn’t sit flush.
Measure from multiple points. Check for bumps or dips in the existing wall. Factor in skirting boards and coving that might interfere with your design.
Getting measurements wrong by even a few millimetres means buying replacement materials. That £15 sheet of plasterboard becomes £45 when you’ve cut three wrong before getting it right. Understanding the proper building process helps you avoid these basic but costly errors.
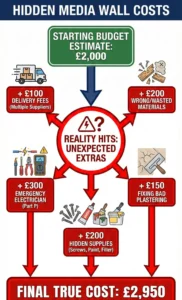
Forgetting the Budget Buffer
Every building project hits unexpected costs. Screws snap. Materials arrive damaged. You discover the wall needs more preparation than expected.
Smart planners add 15-20% to their initial budget estimate. This buffer covers the surprises without derailing the whole project.
Without it, you’re stuck halfway through with no money for the plasterer or the final paint. That £2,000 budget should really be £2,300-£2,400 once you account for reality.
Material Selection Mistakes That Cost More Later
Cheap materials feel like smart savings until they fail. Then you’re paying twice—once for the bargain materials and again for the proper replacements.
Material quality affects how your media wall looks and how long it lasts. The wrong choices show their problems within weeks or months, not years.
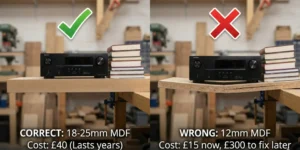
Using MDF That’s Too Thin
MDF comes in different thicknesses for good reason. Shelves and load-bearing parts need at least 18mm thickness, preferably 25mm.
Thinner MDF (12mm or less) works fine for decorative panels. Use it for shelves and you’ll watch them sag within months under the weight of your equipment.
Replacing sagging shelves means partially dismantling your media wall. That £10 you saved on thinner MDF costs £150-£300 in repairs. Choosing the right materials from the start prevents this entirely.
Budget Materials Without Longevity
The cheapest plasterboard, paint, and timber might hit your initial budget target. They won’t survive five years of normal use.
Quality materials cost 20-30% more upfront but last three times longer. Budget materials chip, crack, and discolour faster, especially around heat sources like electric fires.
When your media wall starts looking shabby after two years, you face an expensive choice. Live with it or redo the whole thing properly.
Not Accounting for Delivery Fees
Materials aren’t expensive. Getting them to your house is.
A full media wall build requires bulky items—sheets of MDF, plasterboard, timber studs. These trigger delivery charges of £30-£100 depending on supplier and distance.
Order from multiple suppliers to save a few quid per item? You’ll pay delivery fees three or four times instead of once. Factor in delivery costs when comparing prices, not after you’ve already ordered.
Electrical and Safety Errors That Break the Bank
Electrical mistakes aren’t just expensive. They’re dangerous and illegal if done wrong.
All electrical work in UK homes must comply with Part P Building Regulations, which aren’t suggestions—they’re the law. Ignoring them creates safety hazards and could invalidate your home insurance.

DIY Electrical Work Without Qualifications
Running cables might look simple on YouTube. Doing it legally requires a qualified electrician.
Part P regulations require any new circuits, sockets, or significant electrical work to be certified by a competent person. That means someone registered with a scheme like NICEIC.
DIY electrical work that doesn’t meet regulations costs £300-£600 to put right. If there’s a problem and your insurance finds out it wasn’t done properly, you’re not covered. The electrician costs £200-£400 upfront, but it’s the only legal option.
Wrong Power Outlet Placement
Sockets in the wrong place mean visible extension leads or walls that need opening up again. Neither option is cheap or looks good.
Plan socket positions before the studwork goes up. Think about where your TV, soundbar, games consoles, and fire plug in. Add extra sockets for things you haven’t thought of yet.
Moving sockets after the wall is finished costs £100-£200 per socket. Getting it right the first time costs nothing extra except thinking ahead.
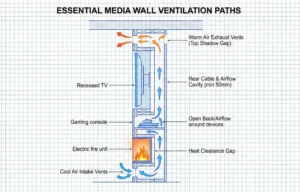
Inadequate Ventilation Planning
Electronics generate heat. Trap that heat and you shorten the lifespan of expensive equipment.
Gaming consoles, Sky boxes, and amplifiers need airflow. Media walls with closed storage and no ventilation create hot boxes that damage your gear.
According to the Energy Saving Trust, proper ventilation also helps electric fireplaces run more efficiently. Build in air gaps, vents, or alcove spacing from the start. Retrofitting ventilation means cutting holes in finished walls—messy and expensive.
Installation and Construction Blunders
Even with good materials and proper planning, installation mistakes add costs. These errors show up immediately in your finish quality.
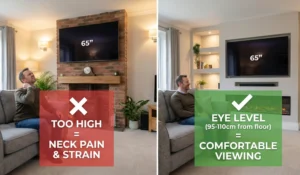
Incorrect TV Mounting Height
Mount your TV too high and you’ll get neck strain every time you watch. It’s one of the most common complaints about media walls.
The centre of your screen should sit at eye level when you’re seated. For most people, that’s 95-110cm from the floor to the middle of the TV.
Mounting it above a fireplace often puts it too high. If you’ve already built the recess in the wrong position, you either live with poor ergonomics or tear out the work and start again. That costs £200-£400 in wasted materials and labour.
Poor Cable Management
Visible cables ruin the clean look that makes media walls attractive. Hiding them after the wall is finished costs far more than planning ahead.
Route all cables through the studwork before you add plasterboard. Install conduit or trunking for future changes. Leave access panels for reaching connections later.
Retrofitting cable management means opening up walls, adding £150-£400 to your costs. Worse, you might damage finished surfaces trying to thread cables through spaces that weren’t designed for them.
Rushing the Plastering Stage
Plastering separates amateur finishes from professional ones. It’s also the stage where impatient DIYers make expensive mistakes.
Each plaster coat needs time to dry properly. Paint over wet plaster and it bubbles. Rush the smoothing and you see every imperfection under paint.
Poor plastering that needs redoing costs £150-£400 for a professional to strip and restart. Take your time, let each stage dry, and do it once properly. Comparing DIY versus professional approaches shows why this stage often benefits from expert help.
Building Uneven Framework
The stud framework is your media wall’s skeleton. Get this wrong and everything else sits crooked.
Every piece of timber should be checked with a spirit level as you fix it. The framework must be perfectly square and plumb. Corners should be true right angles.
An uneven frame means gaps in your plasterboard, shelves that tilt, and TV mounts that don’t hang straight. Rebuilding failed studwork costs £200-£600 because you’re essentially starting from scratch.
Cost Underestimation Traps
Most budget overruns come from costs you didn’t know existed. These hidden expenses ambush your project halfway through.
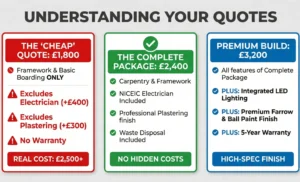
Accepting the Cheapest Quote
Three quotes come back. One is £1,800, another is £2,400, and the last is £3,200. The cheapest sounds tempting.
Ask why that quote is so much lower. Does it include plastering? Electrical work? Finishing materials? Or just the basic framework?
Cheap quotes often miss crucial elements. You accept £1,800, then discover you need another £800 for the plasterer and electrician. Suddenly you’re spending £2,600 when the £2,400 quote included everything.
Quality matters too. Installers who charge properly usually deliver better work with warranties. Extremely cheap quotes signal cut corners, inexperienced workers, or incomplete scope.
Not Budgeting for All Three Tradespeople
A complete media wall needs three specialists. You need a carpenter for the framework, an electrician for wiring, and a plasterer for finishing.
First-time builders often budget for just the carpenter. Then they discover electrical work adds £200-£400, and plastering adds another £150-£400.
That £2,000 DIY project becomes £2,750 minimum once you’ve hired the people you actually need. Budget for all three from the start, not as afterthoughts.
Ignoring Hidden Costs
Beyond materials and labour, smaller costs add up quickly. Screws, adhesive, filler, primer, paint, sandpaper, dust sheets—none cost much individually.
Together they add £100-£200 to your bill. Then there’s tool hire if you don’t own everything. Waste disposal for offcuts and packaging. Possibly decorating the rest of the room to match your new wall.
These costs seem minor until you’re £300 over budget and still need to buy paint. List every single item you’ll need before you start, not as you go along.
Forgetting About Access Panels
Installing everything behind a sealed wall looks clean. It becomes a nightmare when something needs changing.
HDMI cables fail. Sky boxes need replacing. You might want to upgrade your sound system. Without access panels, you’re opening up finished walls to reach connections.
Building in small, discreet access panels costs nothing during construction. Adding them later means cutting holes in painted, finished surfaces—messy and expensive. Think about maintenance before you seal everything away.
Design Mistakes That Create Future Problems
Some mistakes don’t show their cost until months or years later. These are the ones that make you wish you’d done things differently.
Building Too Tightly Around Current TV
TVs get bigger and cheaper every year. The 43-inch screen you have now might become 55 inches in two years.
Build your TV recess exactly to size and you’ve locked yourself into that screen size forever. The next TV either doesn’t fit or leaves awkward gaps.
Leave 5-10cm clearance around your current TV. This flexibility costs nothing now but saves hundreds later when you’re not rebuilding the recess for a new screen.
Not Planning for Technology Changes
Media walls built five years ago didn’t account for soundbars, smart home hubs, or the latest gaming consoles. Now they look dated with cables trailing to new equipment.
Think beyond your current setup. Where will future devices sit? How will they connect? What cables might you need that don’t exist yet?
Future-proofing means extra cable runs, additional power sockets, and spaces for equipment you don’t own yet. It’s cheaper to include these during construction than retrofitting them later.
Ignoring Resale Impact
A media wall built specifically around your 65-inch TV and particular equipment might not suit the next homeowner. Extremely customised installations can actually reduce appeal.
Keep designs relatively neutral. Avoid colour schemes that date quickly or custom sizes that only work with specific equipment. A well-built, flexible media wall adds value to your home. An overly specific one becomes a problem for future buyers.
Estate agents suggest neutral media walls can boost home value by 3-5%. Unusual designs might put buyers off or require removal before sale—both cost you money.
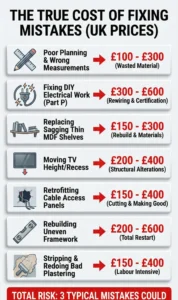
How Much Do These Mistakes Actually Cost to Fix
Each mistake carries a specific price tag for putting it right. These aren’t estimates—they’re what UK tradespeople actually charge to fix common media wall errors.
Poor planning that leads to wrong measurements costs £100-£300 in wasted materials plus labour to rebuild. DIY electrical work that needs professional correction runs £300-£600 to bring up to Part P standards.
Thin MDF shelves that sag require £150-£300 to replace with proper thickness once installed. TV mounted at wrong height costs £200-£400 to modify the recess or rebuild the mounting area.
Missing cable access adds £150-£400 to cut access panels and make good the finish. Uneven studwork costs £200-£600 to rebuild the framework correctly.
Poor plastering finish runs £150-£400 for a professional to strip and redo. Wrong socket positions cost £100-£200 per socket to relocate. No ventilation adds £100-£300 to retrofit vents without ruining the finish.
These costs stack up. Make three mistakes and you’ve added £500-£1,500 to your project. That’s why getting it right first time matters so much.
How to Avoid Media Wall Cost Mistakes
Prevention costs nothing but saves hundreds. Start by getting three to five quotes from different installers before committing to anyone.
Always hire a Part P registered electrician for any wiring work. Don’t attempt electrical work yourself, even if you’re confident with other DIY tasks. The legal requirements exist for good reason.
Create detailed plans before buying materials. Measure everything twice and account for the 15-20% budget buffer. List every item you’ll need, including delivery fees and small supplies.
Choose quality materials for structural elements like shelves and framework. Budget materials work fine for decorative parts, but load-bearing components need proper thickness and strength.
Think about future needs. Leave extra cable runs, additional sockets, and clearance around your TV for upgrades. Build in discreet access panels for maintenance. Design with flexibility rather than locking yourself into current equipment sizes.
Take time with each stage. Let plaster dry properly before painting. Check framework is level before adding boards. One extra hour of careful work saves days of fixing mistakes later.
Final Thoughts
Media wall cost mistakes follow patterns. They start with rushing, skipping steps, or trying to save money in wrong places. The most expensive word in any media wall project is “later.” Planning it later, hiring the electrician later, fixing the mistake later—all cost more than doing it properly from the start. Give your project the time and budget it actually needs, not what you wish it needed.
Frequently Asked Questions
Is it expensive and a pain to replace the TV or fix problems once it’s boxed in?
Yes, this is a common regret. Without access panels, you’ll need to cut into finished walls just to replace cables or upgrade equipment. HDMI cables fail, connections loosen, and TVs need replacing eventually. Build small access panels during construction—they cost nothing but save £200-£400 in future wall repairs.
Will the TV be too high if I put it above the fireplace?
Usually yes. This is the most complained-about media wall mistake in UK forums. TVs above fireplaces often sit too high, causing neck strain. The screen centre should be at eye level when seated (95-110cm from floor). Keep the fire low and leave proper clearance between it and the TV.
Don’t you need a soundbar because the TV speakers are on the back?
Yes. Boxing in a TV blocks rear-facing speakers, making sound muffled. You’ll need a soundbar (£100-£300) or separate speakers (£500+). Plan the wiring and shelf space for audio equipment before you start building, not after.
Can I do the electrical work myself and just get an electrician to inspect it after?
No. UK Part P regulations require qualified electricians to design, install, and certify all electrical work themselves. NICEIC electricians cannot legally sign off DIY work. Attempting this is illegal, voids insurance, and costs £300-£600 to fix properly later.
What’s a fair price for a media wall? I’ve had quotes from £1,800 to £3,200—which should I trust?
Check what each quote includes. The £1,800 likely covers just carpentry. The £2,400 probably includes electrician and plasterer. The £3,200 might add premium finishes. Ask for itemised breakdowns showing exactly what’s included. Quotes 30% below others often exclude essential work you’ll pay for separately.
