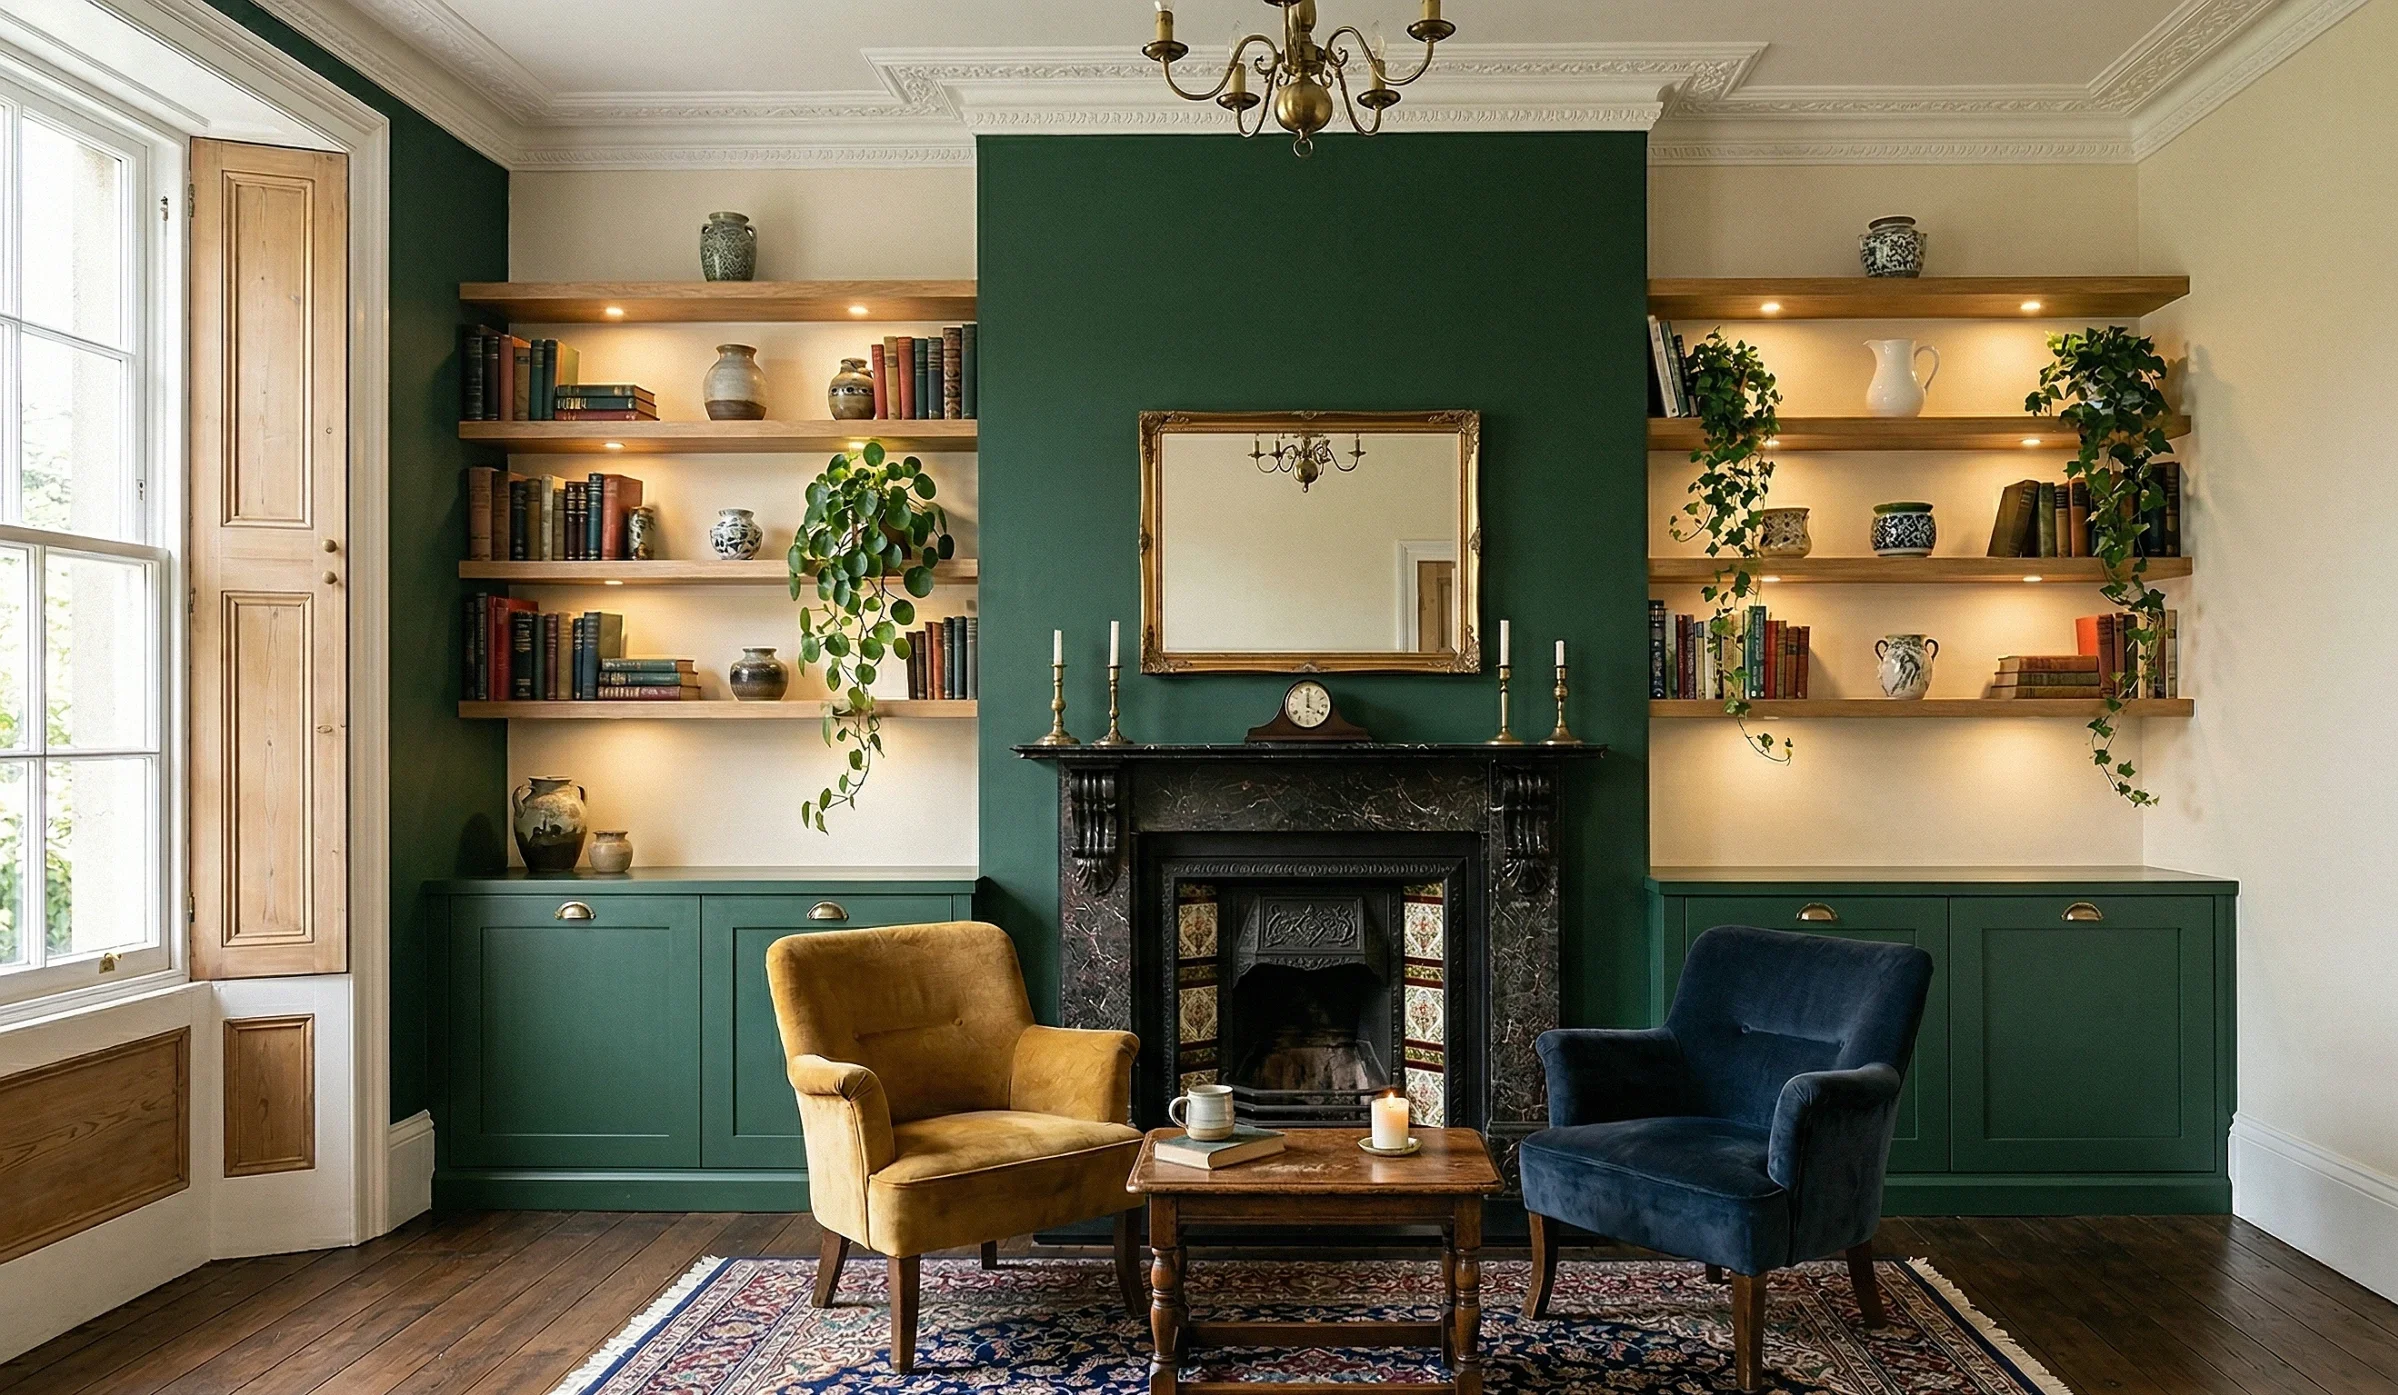
An alcove media wall uses the recessed spaces either side of a chimney breast to house shelving, cupboards, and a TV — either mounted on the breast face or recessed into one of the alcoves.
In Victorian and Edwardian terraces, the structure is already there. The projection gives you a natural focal point. The recesses give you flanking storage. The brickwork gives you the solid fixing surface a TV mount needs.
This guide covers chimney breast safety checks, how to measure out-of-square alcoves, the TV placement decision, design options for 2026, and what it costs. Browse our full media wall ideas guide if you are still in the inspiration phase — but if you have alcoves and want to know what to do with them, start here.
Key takeaways:
- Victorian and Edwardian alcoves are structurally ready for built-in media walls — depth and recesses already exist
- Check the chimney breast for damp, flue ventilation, and structural integrity before building anything
- A professional bespoke alcove unit pair costs £2,500–£5,000; DIY shelving materials cost £150–£400
Why chimney breast alcoves work so well as media walls
Unlike a standard media wall — which requires building a new false wall from scratch — chimney breast alcoves need no new structure. The projection sits at 150–400mm depth, which is exactly what a fitted alcove unit needs to sit flush with the breast face.
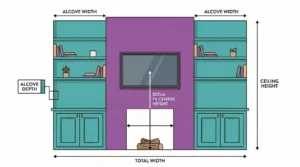
The three-zone layout writes itself. TV on the chimney breast in the centre, display shelving in one alcove, enclosed storage in the other. It is the most balanced arrangement available in a period living room and does not require any structural work to achieve.
Chimney breast safety checks before you build
These four checks must happen before any shelf bracket or stud goes into the chimney breast. Skipping any one of them is the most common reason alcove builds fail within two to three years of completion.
Check for damp first
Old coal burning left hygroscopic salts in Victorian brickwork that attract moisture even decades after the fireplace stopped being used. A surface damp meter reading alone is unreliable — salts produce high readings even on a dry wall.
Look for stained plaster, tide marks, or crumbling render around the fireplace opening. If any are present, fix the cause — typically failed external flashings or cracked pointing — before building over the surface. Sealing damp behind alcove units makes it worse.
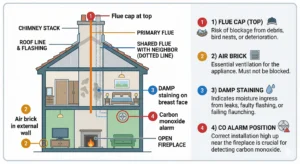
Flue ventilation — air brick required
A capped chimney with no ventilation creates a sealed void that collects condensation. This causes internal damp inside the alcove cupboards within a few years.
If the fireplace opening has been blocked off, confirm an air brick is present on an external wall connected to the flue. If it is missing, have one installed before the build starts. It is a straightforward job for any builder and costs very little relative to the damage a ventilation failure causes.
Carbon monoxide in terraced houses
Victorian terraces share chimney stacks with adjoining properties. If a neighbour uses a gas fire, wood burner, or boiler connected to the shared stack, and the flue separation is damaged, combustion gases can migrate into your sealed chimney void.
Fit a carbon monoxide alarm in the room before sealing any fireplace opening. If the stack has been altered or you have any doubt about flue integrity, commission a CCTV flue survey from a HETAS-registered engineer. HETAS is the UK government-approved competent persons scheme for chimney-related work.
Residual heat from the flue
Some disused chimneys still carry warm air rising from a neighbouring property’s active fire. Before recessing a TV into the breast face, check the surface temperature across seasons. Electronics on a consistently warm surface degrade faster. A layer of thermal board between the brickwork and the build frame resolves the issue if warmth is present.
How to measure alcoves correctly
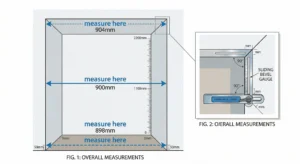
Victorian walls are almost never square. The back of the alcove is typically narrower than the front. Side walls taper. A unit built to the front measurement will not pass through the narrowest point during installation.
Take three width measurements at floor, mid-height, and ceiling level. Build to the smallest. Do the same for depth, measuring from the back wall to the chimney breast face. Subtract 10mm from the smallest depth reading as an installation clearance.
Using a sliding bevel for angled walls
Where side walls run at a slight angle, a sliding bevel gauge copies the exact angle directly. Place the body against the back wall, extend the blade to the side wall, and lock it. Transfer the angle to the shelf or panel before cutting. Number each shelf from floor to ceiling after the first cut — alcoves often taper and each shelf may be a slightly different shape.
Cardboard template for complex alcoves
For alcoves with a protruding skirting, uneven back wall, or unusual return at the top, cut a cardboard template before committing to timber. Slide it into the alcove, trim until it fits, then transfer the shape to the shelf material. Twenty extra minutes here prevents expensive waste.
When the alcoves are different sizes
Asymmetric alcoves are common in UK terraces where internal walls have been moved or the chimney stack is not centred. Build each unit to its individual dimensions and use a consistent design language — same door style, same shelf heights, same colour — to create visual symmetry across two physically different spaces.
TV on the chimney breast or in the alcove?
This is the first design decision and it determines everything else.
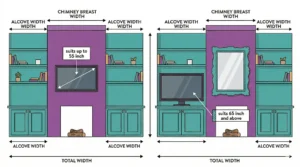
TV on the chimney breast face
Suits TVs up to 55 inches in most period rooms — the breast face is typically 750–1,050mm wide, which balances a 55-inch screen without the TV edge overlapping the alcoves. Both recesses remain fully available for storage.
For 65 inches and above, the TV overhangs the breast and begins to overlap the alcoves visually. This can work if the alcove units are designed around the overlap — but it requires careful planning with the joiner.
TV recessed into one of the alcoves
Suits 65-inch and larger screens, or homeowners who want the TV to be discreet rather than the room’s focal point. The screen sits inside the recess at 107cm centre height, the opposite alcove has matching shelving, and the chimney breast face becomes a display surface for a mirror or artwork.
Most alcoves are 200–350mm deep. A TV mount plus screen body typically needs 100–150mm from the back wall, leaving enough clearance for cables and ventilation in all but the shallowest recesses.
Alcove media wall design ideas
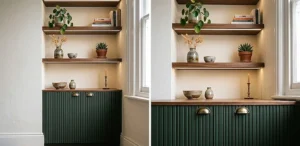
Shelves above, cupboards below
The most functional UK alcove configuration. Shaker-style enclosed cupboards in the lower section up to 800–900mm from the floor, floating shelves in the upper section at approximately 250mm vertical spacing.
LED spotlights recessed into the underside of each shelf at 2,700–3,000K create warm accent light that makes the alcove a visual feature even when the TV is off. Cool white LEDs read as clinical against period architecture — avoid them.
Flush vs projected build
Flush units — front face of the cabinet aligns exactly with the chimney breast face — read as seamless architecture. Projected units — coming 50–150mm in front of the breast — read as deliberate furniture. Flush suits contemporary interiors. Projected suits traditional period rooms where the alcoves are treated as a furniture feature.
Colour and contrast
Chimney breast darker than alcoves: the breast projects visually as well as physically, drawing the eye to the fireplace and TV. Deep green, charcoal, and navy all perform well on a breast face in a period room.
Alcoves darker than chimney breast: the recesses appear deeper, the breast sits quietly as a background element. A more restrained approach for rooms with an already busy colour scheme.
Our media wall colour ideas guide covers the dominant UK palette shift for 2025–26 in detail.
2025–26 finishes: reeded doors and walnut shelves
Reeded MDF cabinet door faces — vertical ridges across the surface — add tactile depth while keeping the overall look contemporary. They echo the fluting on original period architraves and cornices, making them a natural fit in Victorian and Edwardian rooms.
Walnut veneer shelf surfaces paired with a sprayed MDF carcass is the most requested alcove unit specification from UK joiners in 2025–26. The warmth of walnut against a painted teal or green carcass is consistently the strongest visual result.
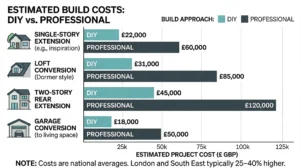
What does an alcove media wall cost in the UK in 2026?
| Build type | DIY materials | Professional |
| Floating shelves only (both alcoves) | £150–£400 | £600–£1,200 |
| Shelves and MDF cupboards (both alcoves) | £400–£900 | £1,800–£3,000 |
| Bespoke painted joinery, LED lighting | — | £2,500–£5,000 |
| Sprayed finish, walnut shelves, reeded doors | — | £4,000–£8,000+ |
Add £200–£400 for Part P electrical work if a new socket or circuit is required. Add £80–£150 for a HETAS flue survey. Add £300–£600 for a structural engineer if there is any uncertainty about the breast’s loadbearing status. Costs in London and the South East run 25–40% higher than the Midlands and North.
DIY vs professional
Floating shelves are within reach of a competent DIYer. MDF cupboard construction is not — getting doors to hang square and close flush in an out-of-square alcove requires accurate joinery. A slightly misaligned door on a painted unit is immediately visible and hard to fix without remaking the component.
Sprayed finishes always need a professional. Roller and brush painting on large flat MDF door faces produces visible brush marks. A spray finish requires specialist equipment and produces a result that painted in-situ cannot match.
UK building regulations
Adding a new socket inside the alcove unit falls under Approved Document P of the Building Regulations. The work must be carried out or signed off by a registered electrician.
To find a qualified electrician who can self-certify under Part P, use NICEIC’s registered electrician search.
6 alcove media wall mistakes that are easy to avoid
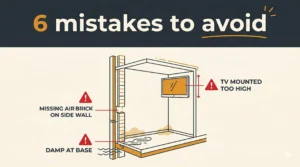
- Not measuring at multiple heights. Victorian walls taper. Measure at floor, mid-height, and ceiling level and build to the smallest dimension.
- Skipping the damp check. Building over an active damp problem seals it in. A stained breast face or tide marks near the floor are warning signs. Fix the cause before building.
- No air brick for a sealed flue. A capped chimney without ventilation condenses internally. An air brick on an external wall connected to the flue is not optional.
- TV too high on the chimney breast. The fireplace opening pushes the screen upward. At 70 inches from the floor, viewing causes neck strain. Keep the screen centre at 107cm — if the fireplace prevents this, recess the TV into an alcove instead.
- Building both units to the smaller alcove’s dimensions. Asymmetric alcoves need individually sized units. A unit built short for the wider alcove always reads as unfinished from across the room.
- No cable access inside the cupboard. Once the unit is built and the back panel fixed, cables cannot be changed without opening the wall. Build a removable back panel or a brush plate access point before painting.
The alcove media wall is not a trend. It is the natural conclusion of what Victorian builders created when they put a chimney breast in the middle of a room. Measure it properly, check it is sound, and commission joinery that matches the quality of what is already there.
Frequently asked questions
Can I build an alcove media wall if my alcoves are different sizes?
Yes. Build each unit to its individual alcove dimensions and use the same door style, shelf heights, and colour across both. The eye reads the pair as matching even when the physical widths differ.
Does the TV go on the chimney breast or in the alcove?
On the breast for TVs up to 55 inches — the breast is typically wide enough and both alcoves stay free for storage. In the alcove for 65 inches and above, or where you want the TV to be discreet. The breast face then becomes a display surface for a mirror or artwork.
Do I need to check the chimney before building around it?
Yes. Check for damp, confirm an air brick is present if the flue is sealed, and fit a carbon monoxide alarm. If the stack has been altered or you are unsure about structural integrity, a HETAS flue survey and a structural engineer check are worthwhile before you start.
How deep should alcove cupboards be beside a chimney breast?
300–400mm is the standard working depth. For alcoves shallower than 200mm, floating shelves work better than enclosed cupboards — there is not enough depth for a functional door swing.
Should I paint the chimney breast darker or the alcoves darker?
Chimney breast darker makes the projection and the fireplace the visual focal point. Alcoves darker makes the recesses appear deeper and lets the breast sit quietly as a background. Both work — pick one and apply it consistently to the full chimney wall.